Ontology Engineering Class
Offered at RPI, Fall 2026
Offered at RPI, Fall 2026
Projects
Guidelines
The git serializer will run whenever you make a git commit and will ensure that your ontology source files are formatted in such a way that they can be easily diffed when changes are made.
The serializer requires Java and should work with version 8 or later. If you don’t have Java installed on your machine, download and install it from the Java website.
Installing the serializer will involve modifications to a hidden folder within the repository: .git.
Make sure that the file browser you are using is capable of displaying hidden files.
Instructions for installing the serializer:
.git/hooks/ within the ontology-engineering repository..git/hooks/.
pre-commit instead of pre-commit.txt).
Behavior for this varies by OS, but if you have an option to save as a particular file type, select “All files”.chmod +x .git/hooks/pre-commit.git/hooks/pre-commit, set line 12 (export JAVA_HOME="...) to match your java installation.
JAVA_HOME should be a path the points to the java installation directory, which will vary from system to system.
The JAVA_HOME directory should have a bin folder containing the java executable.JAVA_HOME should be in quotation marks.JAVA_HOME environment variable, you can simply comment the line out: #export JAVA_HOME=....
Only do this if you are certain you have already configured JAVA_HOME.To make sure everything is working, open a command line interface (e.g. Terminal in SourceTree) and navigate to the ontology-engineering repository directory.
When you run git commit, you should see output similar to below preceding the normal git output:
 rdf-toolkit: sesame-serializer: This is the pre-commit hook
 rdf-toolkit: sesame-serializer: java_home = /usr/lib/jvm/default
 rdf-toolkit: sesame-serializer: whichJava = /usr/lib/jvm/default/bin/java
 openjdk version "1.8.0_265"
 OpenJDK Runtime Environment (build 1.8.0_265-b01)
 OpenJDK 64-Bit Server VM (build 25.265-b01, mixed mode)
 rdf-toolkit: sesame-serializer: versionJava =  1.8.0_265
 rdf-toolkit: sesame-serializer: java_major=1
 rdf-toolkit: sesame-serializer: java_minor=8
 rdf-toolkit: sesame-serializer: Found rdf-toolkit: /home/sam/workspace/ontology-engineering/.git/hooks/rdf-toolkit.jar
Every time you push commits to your branch, a continuous integration job will run ontology hygiene checks on your branch. These checks will examine the ontologies in the repository and report errors if the ontologies do not conform to certain best practices.
The checks will pick up ontologies in files with extensions .rdf, .ttl, or .jsonld.
These files can be anywhere in the repository.
Resources in your ontology that do not contain twc in the namespace will not be checked.
This is done to prevent checking of imported ontologies.
All of the resources for ontologies you develop must contain twc in the namespace.
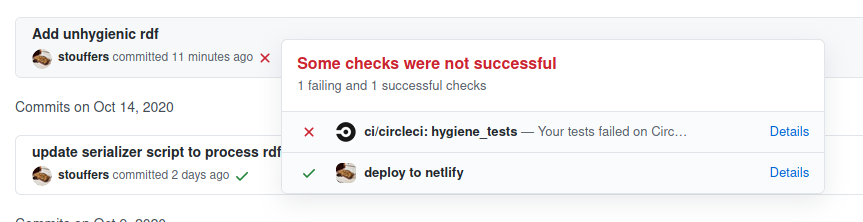
If the hygiene checks find errors in your ontologies, then the CI job will fail. This will update the status of your latest commit to indicate that it did not pass checks. When submitting assignments, your ontologies must pass all hygiene checks.
The checks will also detect less severe ontology issues that are treated as warnings instead of errors. At first, warnings will not affect the passing status of the hygiene checks and will simply be logged in the CI output. Later on in the course, however, the CI job will be altered so that it will fail if any warnings are detected. Because of this, it is recommended that you check the CI logs periodically as you build your ontology to be aware of any warnings that may be accumulating.
You can view details about the hygiene test runs on the project CircleCI page. To have permissions to view the project CI page, you will need to sign up for CircleCI using the same GitHub account that is used for this class.
An easy way to get to the hygiene output for a particular commit on GitHub is via the commit status. The commit status is represented as a small icon next to the commit message that will be either a green check mark, yellow circle, or red X. To get to the hygiene output, click on the commit status icon and then click on “Details” next to the “hygiene_tests” check. This will bring you to a page containing details about the CircleCI job that was run for that commit.
On the CircleCI job page, you can view the hygiene logs for that job by going to to the “Steps” tab and expanding the “Run hygiene tests” step. Note: Any errors reported in the “Tests” tab will not list all occurrences of the error. Because of this, it is recommended to look in the logs when attempting to debug job failures.
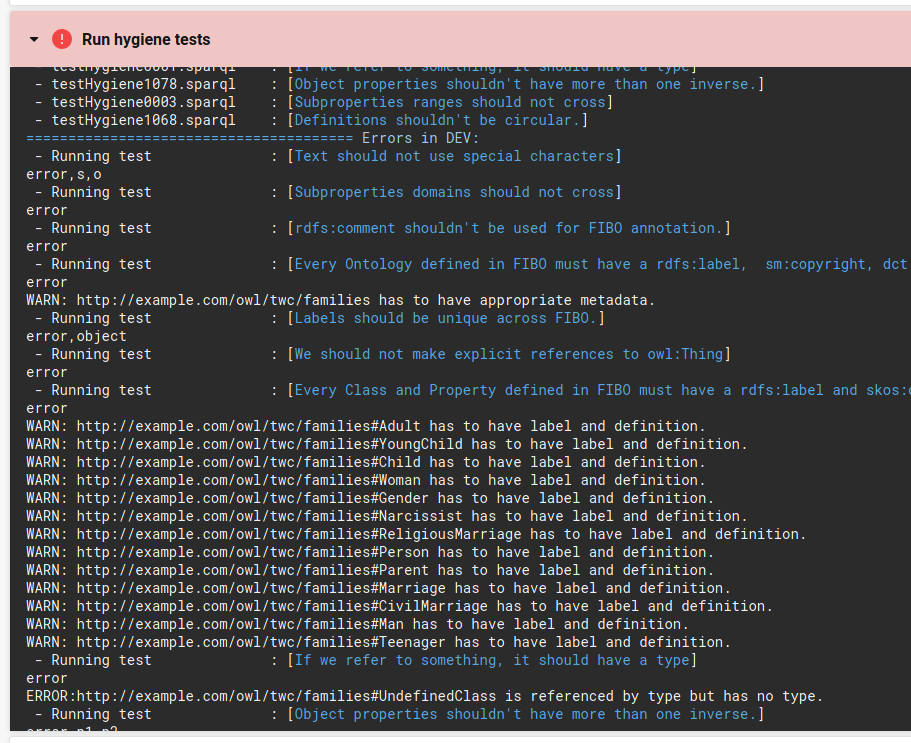
There will be a lot of debug output in the logs that can be ignored. The relevant section for test results will be below the following line:
======================================= Errors in DEV:
Note that there will be a similar section labeled Errors in PROD. This section should be ignored.
Each individual check will have a line like the following:
- Running test : [Text should not use special characters]
This will be followed by a header line that indicates the output format.
The header line will be something like error or error,s,o, so don’t assume that seeing something like this indicates an error.
After the header line, any errors or warnings will be printed.
These lines will be in the format ERROR: ... or WARN: ....
Find install link here
Ubuntu users can run the following command
sudo apt update && sudo apt install default-jdkYou can find the latest release here
Download the jar file
Create a directory called “blazegraph”
Move the jar file into that directory
Download validation ontology by first going to here
Right click and save this file into your working directory
Open a terminal window
Within the terminal, change to your working directory
cd blazegraphRun blazegraph
java -server -Xmx4g -jar blazegraph.jarOnce blazegraph has started, use a web browser to go to the URL that is specified
Go to the Update tab
Click ‘Choose File’ and load the ontology file
Specify the Type as ‘RDF Data and the Format as ‘Turtle’
Press the Update button and switch over to the query tab – we are ready to begin!